
André Barbosa
|
2018-12-04
|
30 mins to read
This will be a brief article on how we had to integrate a Redis-based cache for one of our client’s services. The idea was to have CRUD repositories for some of the most requested entities and reduce the load on a third party provider we were using at the time. The issue was a common one: we needed to do a vast number of calls to this provider and it was not scaling. Having Redis as a middle layer to cache the content already processed allowed us to scale.
How Redis works
Redis is an open-source in-memory data structure store that uses RAM for storing data, and as such, all Redis data is stored primarily in the server’s main memory. This makes it so that both read and write operations are very fast; in fact, most requests to Redis complete in less than a millisecond, allowing a single server to handle millions of concurrent requests every second. Thanks to this characteristic, Redis can be used as a database, cache, and a message broker wherever performance is key.
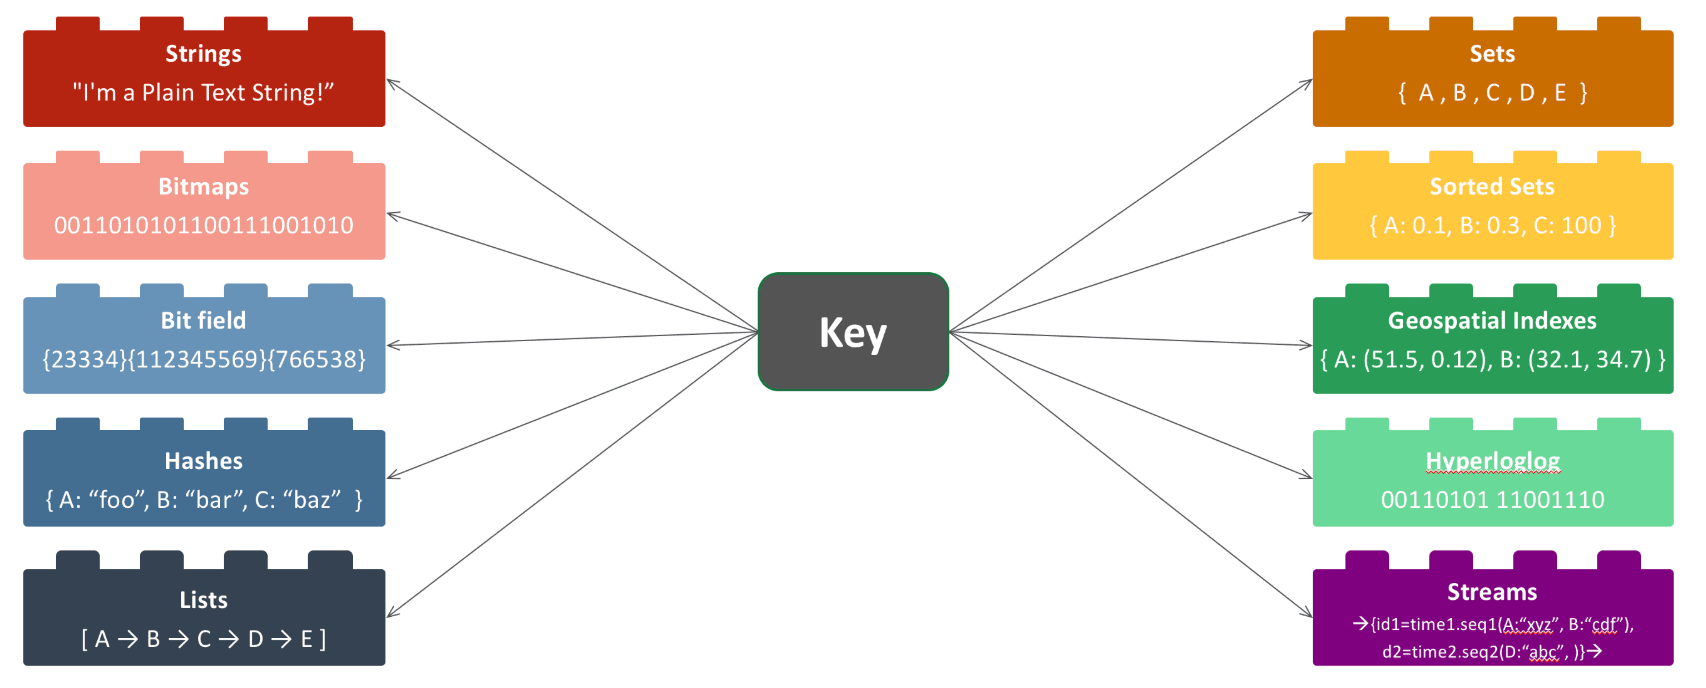
The database itself is a dictionary that maps keys to their respective values and guarantees constant time access by key. Essentially you can have Redis collections of given data types and access said collections with their respective key. You can store high-level data structures such as lists, sets, and hashes as well as Bitmaps and Bitfields to more efficiently store boolean and numeric data.
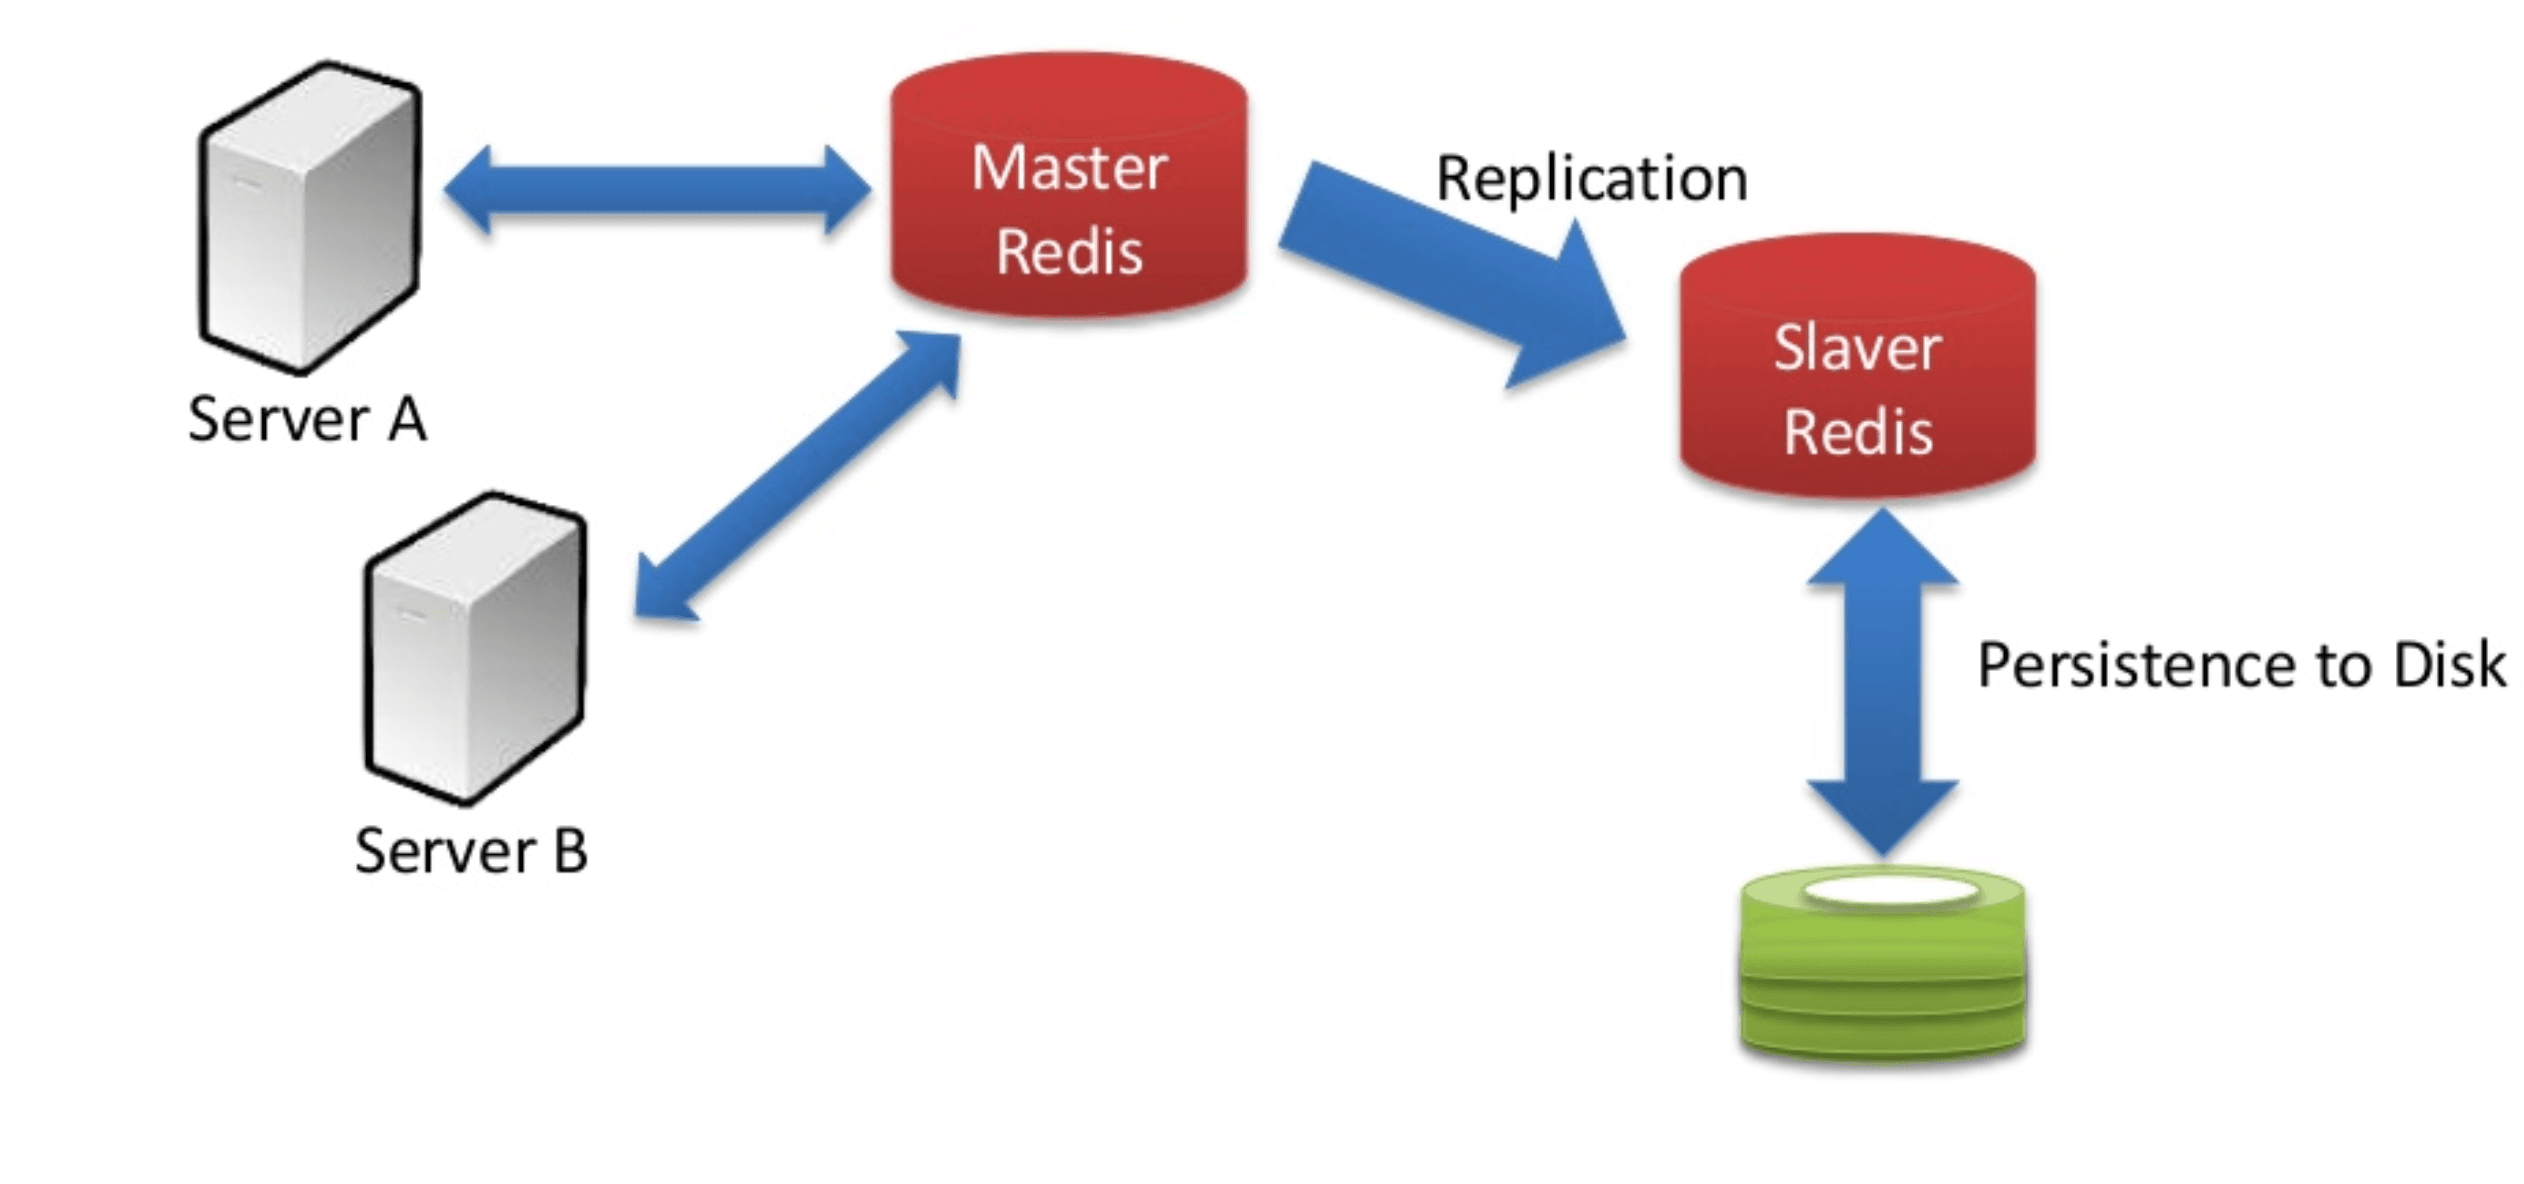
A typical Redis architecture will look like the following:
Redis be configured in several ways to address the limits and volatility of RAM. Other than replying with an “out of memory” error when memory is maxed out, Redis can be set up to evict data based on usage frequency, recentness, or random policies. Furthermore, every key in Redis can be assigned with a time-to-live (TTL) that will cause the value to be deleted once expired. It can also use asynchronous replication to maintain one or more secondary replicas with updates from a single primary source. Depending on whether Redis is used in single-instance or clustered mode, it can be set up for high availability. Additionally, databases are scaled by partitioning the keyspace and assigning each partition dedicated memory, compute, and network resources. Redis cluster automatically partitions the data among multiple Redis servers across multiple nodes.
Possible frameworks
LETTUCE VS JEDIS
While Jedis is easy to use and supports a vast number of Redis features, it is not thread safe and needs connection pooling to work in a multi-threaded environment. Connection pooling comes at the cost of a physical connection per Jedis instance which increases the number of Redis connections.
SYNC VS ASYNC
One other reason we opted to go with Lettuce was that it facilitates asynchronicity from building the client on top of netty that is a multithreaded, event-driven I/O framework. Asynchronous methodologies allow you to utilize better system resources, instead of wasting threads waiting for network or disk I/O. Threads can be fully utilized to perform other work instead.
For the purpose of having a concurrently processing system, it’s convenient, in this scenario, to have all communication handled asynchronously. There are scenarios where this might not be the case, where you have quick running tasks and try to access data that has just been invalidated by a different task.
Redis Configuration
Going into the code we will need to create a new class and annotate it with the following:
@Configuration
@EnableConfigurationProperties(RedisProperties.class)
public class RedisConfig{
}
This will create the bean for the config with the respective properties. We’ll need to include the host and the port for our Redis server from our application properties:
@Value("${redis.host}")
private String redisHost;
@Value("${redis.port}")
private int redisPort;
For starters, we’ll have to create beans for our client’s resources (which will be the default ones) as well as a simple, standalone configuration. Additionally, we’ll also add to our client options:
@Bean(destroyMethod = "shutdown")
ClientResources clientResources() {
    return DefaultClientResources.create();
}

@Bean
public RedisStandaloneConfiguration redisStandaloneConfiguration() {
    return new RedisStandaloneConfiguration(redisHost, redisPort);
}

@Bean
public ClientOptions clientOptions(){
    return ClientOptions.builder()
            .disconnectedBehavior(ClientOptions.DisconnectedBehavior.REJECT_COMMANDS)
            .autoReconnect(true)
            .build();
}
Looking at the client options, we will simply reject any requests to Redis in disconnected state while attempting to automatically reconnect to the Redis server should the connection fail.
Now, this is where Lettuce kicks in. Lettuce will provide us with a pooling client configuration which we’ll use to create our connection factory. Essentially, instead of having a single connection, we’ll have a pool of connections to pick from. If no connection is available we’ll simply reject commands as seen above.
Having multiple connections available can definitely be advantageous, for instance:
it allows you to talk to Redis from multiple threads while still getting the benefits of reused connections;
a connection pool works as a set of connections that you can use as needed as opposed to creating connections on the fly;
we just need to create configurations once; this config is reused for the connections on the pool;
allows to easily set up clusters of nodes running Redis instances.
A client pool also helps with compile-time issues where we would be forced to have a working Redis connection up. We definitely don’t want this and, the pooling client in combination with our client options allows us to solve this issue since we do not have to have a working connection on our pool at compile time.
The beans are as follows:
@Bean
LettucePoolingClientConfiguration lettucePoolConfig(ClientOptions options, ClientResources dcr){
    return LettucePoolingClientConfiguration.builder()
            .poolConfig(new GenericObjectPoolConfig())
            .clientOptions(options)
            .clientResources(dcr)
            .build();
}

@Bean
public RedisConnectionFactory connectionFactory(RedisStandaloneConfiguration redisStandaloneConfiguration,
                                                LettucePoolingClientConfiguration lettucePoolConfig) {
    return new LettuceConnectionFactory(redisStandaloneConfiguration, lettucePoolConfig);
}

@Bean
@ConditionalOnMissingBean(name = "redisTemplate")
@Primary
public RedisTemplate<Object, Object> redisTemplate(RedisConnectionFactory redisConnectionFactory) {
    RedisTemplate<Object, Object> template = new RedisTemplate<>();
    template.setConnectionFactory(redisConnectionFactory);
    return template;
}
In the off-case we have multiple qualifying beans for redisTemplate we want, in this context, to make sure we are using this bean so we annotate it with @Primary.
@Value("${app.environment}")
private String ENV;

@Value("${taskScheduler.poolSize}")
private int tasksPoolSize;

@Value("${taskScheduler.defaultLockMaxDurationMinutes}")
private int lockMaxDuration;

@Bean
public LockProvider lockProvider(RedisConnectionFactory connectionFactory) {
    return new RedisLockProvider(connectionFactory, ENV);
}

@Bean
public ScheduledLockConfiguration taskSchedulerLocker(LockProvider lockProvider) {
    return ScheduledLockConfigurationBuilder
            .withLockProvider(lockProvider)
            .withPoolSize(tasksPoolSize)
            .withDefaultLockAtMostFor(Duration.ofMinutes(lockMaxDuration))
            .build();
}
Implementing the cache repository
The Redis template will provide methods for saving most collection types to Redis like hash maps, lists, or sets. We can add/get/delete from cache very easily as long as we define a collection and a key:
//add
template.opsForHash().put(collection, hkey, OBJECT_MAPPER.writeValueAsString(object));

//delete
template.opsForHash().delete(collection, hkey);

//get
OBJECT_MAPPER.readValue(String.valueOf(template.opsForHash().get(collection, hkey)), class);
In order to check if a connection is available you can check for the following condition:
template.getConnectionFactory().getConnection().ping() != null
In order to use our newly created config you can do the following:
@Repository
@Slf4j
public class CacheRepository<T> implements DataCacheRepository<T> {

    @Autowired
    RedisTemplate template; // and we're in business

    private static final ObjectMapper OBJECT_MAPPER;
    private static final TimeZone DEFAULT_TIMEZONE = TimeZone.getTimeZone("UTC");

    static {
        OBJECT_MAPPER = new ObjectMapper();
        OBJECT_MAPPER.setTimeZone(DEFAULT_TIMEZONE);
    }

    // implement methods

   @Override
   public boolean add(String collection, String hkey, T object) {

       try {
           String jsonObject = OBJECT_MAPPER.writeValueAsString(object);
           template.opsForHash().put(collection, hkey, jsonObject);
           return true;
       } catch (Exception e) {
           log.error("Unable to add object of key {} to cache collection '{}': {}",
                   hkey, collection, e.getMessage());
           return false;
       }
   }

   @Override
   public boolean delete(String collection, String hkey) {
       try {
           template.opsForHash().delete(collection, hkey);
           return true;
       } catch (Exception e) {
           log.error("Unable to delete entry {} from cache collection '{}': {}", hkey, collection, e.getMessage());
           return false;
       }
   }

   @Override
   public T find(String collection, String hkey, Class<T> tClass) {
       try {
           String jsonObj = String.valueOf(template.opsForHash().get(collection, hkey));
           return OBJECT_MAPPER.readValue(jsonObj, tClass);
       } catch (Exception e) {
           if(e.getMessage() == null){
               log.error("Entry '{}' does not exist in cache", hkey);
           } else {
               log.error("Unable to find entry '{}' in cache collection '{}': {}", hkey, collection, e.getMessage());
           }
           return null;
       }
   }

   @Override
   public Boolean isAvailable() {
       try{
           String status = template.getConnectionFactory().getConnection().ping();

           if (status != null) {
               return true;
           }

       } catch (Exception e) {
           log.warn("Redis server is not available at the moment.");
       }

       return false;
   }

   @Override
   public Boolean isAvailable() {
       try{
           return template.getConnectionFactory().getConnection().ping() != null;
       } catch (Exception e) {
           log.warn("Redis server is not available at the moment.");
       }
       return false;
   }

}
In this scenario, the autowired annotation will automatically load the Redis template bean we’ve created before. DataCacheRepository is an interface with simple add / find / delete methods. Instead of creating your own interface, you can also use a CRUD repository.
Unitary testing
It’s also pretty straightforward to mock Redis calls on writing unitary tests, for instance:
when(potatoesRepository.isAvailable()).thenReturn(true); // you can also have this be false if you want to cover that case
when(potatoesRepository.addPotato(anyString(), any(Potato.class))).thenReturn(true); // add method returns true if successful
when(potatoesRepository.findPotato(anyString())).thenReturn(null); // calls super class find method and returns null

// test fail case
// ...

when(potatoesRepository.findPotato(anyString())).thenReturn(potato);

// test success case
//...
In this unitary test, we’re attempting to save an object to its respective collection on the Redis server. The key for said collection is a simple string. We trigger a fail case by returning a null object and a success case by returning a valid one. For the sake of exposition, I’ve included both cases on the same unitary test.
Invalidating cache
There are several ways you can do data invalidation:
by defining a Time To Live for the data you are saving
by triggering a delete call when changes occur on the provider’s side
by scheduling a method to clean certain collections every few hours, for example;
- by removing the less recently used keys first (see )
Basically, you want to pick your approach based on the kind of object you are handling. If the said object has a specific granularity, you can schedule a method to trigger a delete call every few minutes or hours. However, since we can’t pass arguments to scheduled methods it is easier to define a TTL for the data you are saving and let the server invalidate the cache lazily. For any other cases where changes happen on the provider’s end due to user input and/or interaction with other micro-services, we can trigger the respective call. Other than that, we can very easily cache new objects but when issuing get/find requests it is best to check if the data is available on Redis before requesting it from the provider and therefore reducing the load on the latter.
See other
Articles